When this is posted I shall be travelling around Europe (I’ve set up delayed publish), while I’m away I will be getting my fix of the Internet through public wireless networks and networks in hostels. As any security conscious person will know public wireless networks are dangerous territory where unless your connections are secured it is possible for hackers to sniff your traffic or worse, so I am setting up VPN access on my Android phone and going to share it with you.

Image source: AndroidAuthority.com
Why connect through a VPN
Wireless networks are similar to talking to your friend across a room, your friend has a bit of freedom to be able to move about while still being able to hear what you say and respond. The problem with this is that there is nothing to stop someone else in the room from listening in to what is being said between you and your friend. While some of your data will go through SSL connections, not all websites implement this properly, which allows a listener to still gather data and some websites don’t try at all.
This can lead to problems with network data because this will include things like user credentials, personal data and authentication cookies. This is a subject which has been talked about extensively within the security circles of the Internet for quite a while, a good explanation about this and discussion on how to perform an attack against this has been written by Troy Hunt (if you’re interested in computer security then this guy is well worth adding to your RSS feed), who uses a Wireless Pineapple produced by Darren Kitchen of Hak5 to intercept wireless data.
By using a VPN you are encrypting all of your data before sending it to the VPN server, where it is decrypted and sent on its merry way to the destination servers. The response is similarly sent to the VPN server, where it is encrypted passed back to you where it is decrypted to allow for you to look at your happy lol cats, happy in the knowledge that no one is intercepting your lols.
Configuration
For this write up I will be using some free VPN credentials available from VPN Gate, which describes itself as;
VPN Gate Academic Experiment Project is an online service as an academic research at the Graduate School of University of Tsukuba, Japan. The purpose of this research is to expand the knowledge of “Global Distributed Public VPN Relay Servers” .
but you are welcome to swap in any credentials you like, there are a large number of free VPNs available as well as many commercial. Remember with any VPN that you are routing your data to the entity that runs the VPN, so make sure as much as possible you trust your VPN provider not to be logging your data.
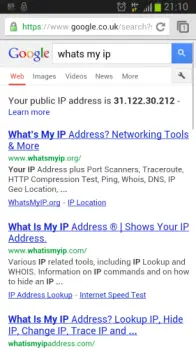
So on with the configuration, the first thing I did was to check what my IP address was currently showing up as. I didn’t realise that Google had started displaying the answer for you before having to go to one of the “What’s my IP?” websites, I guess they’re probably not too happy about that.
So from the looks of it I am 31.122.30.212 (Note: this had changed by the time I finished writing this, so it belongs to someone else now). For the sharp eyed of you, yes this screen shot was taken at the end rather than at the beginning, I decided to just disconnect and reload the page to show the difference.
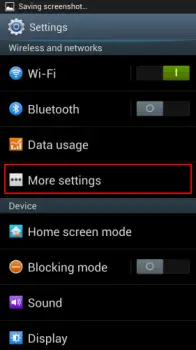
The first thing we need to do is go into our phones settings and select “More Settings”;
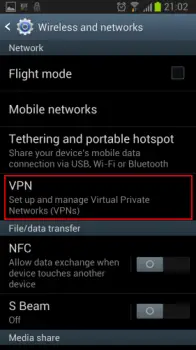
Within the more settings menu, the fourth option is the VPN configuration menu item, it’s nice when it’s clear what to do;
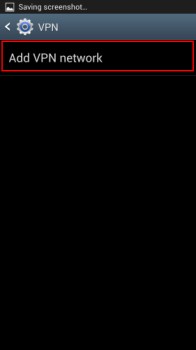
At the moment I don’t have any VPNs set up so there aren’t any showing up here, but if you have several VPNs set up they will be listed here so you can select which one you want to connect to. For the moment we need to configure our first VPN.
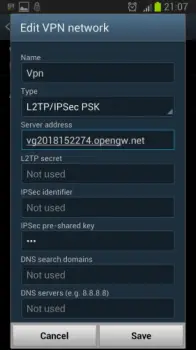
Now I am going to be using some login credentials for a free VPN network provided by VPN Gate. For this we want one of the L2TP/IPSec PSK VPNs that they provide, you are able to filter the list of VPNs that they have on their homepage by what technology they use. Within the ‘advanced’ section of the VPN network configuration, we need to set the VPN pre-shared key and the ‘Forwarding routes’. The pre-shared key used by all VPN Gate VPNs is “vpn”, if you are using a paid for or commercial VPN then the pre-shared key is likely to be a little more complex than that. In forwarding routes, you need to specify “0.0.0.0/0”.
Once we are finished entering the VPN server details, click on save at which point you’ll be taken back to the VPN list page and there will be the VPN that we just set up. By selecting the new VPN you are prompted to specify the login credentials for the VPN, in the case of VPN Gate these are ‘vpn’ and ‘vpn’, paid for and commercial VPN services will have more secure credentials for you to use, but as VPN Gate is a shared service these details are kept simple.
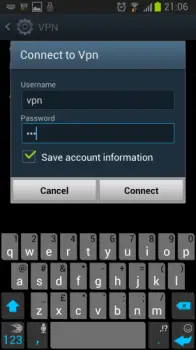
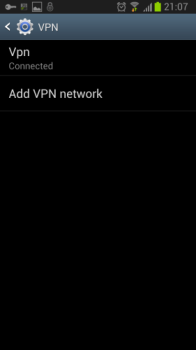
If the VPN details specified are correct then after pressing ‘Connect’ you will now be connected to the VPN network, the VPN that you created will now be listed as ‘Connected’ and there will be a key in the top left-hand corner of your screen.
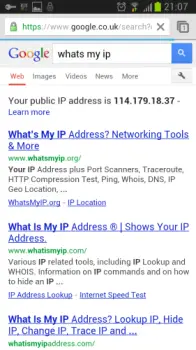
Now that we have connected to the VPN let’s check what our IP address is now showing up as, 114.179.18.37, Google also prompted me to ask whether I really wanted to be using google.co.uk and whether I would rather be using google.jp so looks like it’s a Japanese IP address.
Conclusion
Now I hope that you agree that setting up a VPN on your Android device is painless, so there is no reason for you to be connecting to random wireless networks without securing your network traffic.
I would be interested to hear if anyone has anything else that they do to ensure that their data is secure on their mobiles, iOS, Android and Windows Phones (please no phone wars though).