The Internet is full of bots. There’s no denying it, bots have been created to perform tasks on the Internet for many purposes, a good example is Ticketmaster, who have calculated that approximately 60% of all bookings are made by bots (src nyt).
One of the most common practices for fighting back against bots is by adding what is known as a ‘Completely Automated Public Turing test to tell Computers and Humans Apart’ or CAPTCHA for short. These are commonly either an image or audio clip with letters and numbers that the user has to type into the computer to prove that they are human. One of the most popular versions of the CAPTCHA is reCAPTCHA, which is provided free of charge by Google, this is what we will be using to add a CAPTCHA to our registration page, to avoid bots registering for our website.
The first thing that you’re going to need to do is retrieve your public and private keys from reCAPTCHA, Google have made this incredibly simple, just a case of specifying your domain and whether you would like to limit the keys to just that site. The public and private keys should look something like this;
Public Key: 6LeM4uYSAAAAAOHr4C2VuYjQ12jMEkxFhZ7iO2qY
Private Key: 6LeM4uYSAAAAAJUEXgVNfTHTc32w-aqQ1CbIIpp-
You will need to keep these details safe for later (although you can always go back to the website to retrieve them again).
Now lets go to our ASP.NET MVC application, the first thing that we need to do is to add a NuGet package called ‘reCAPTCHA for .NET’
One of the things that will happen during the installation of ‘reCAPTCHA for .NET’ is that two entries will be added to the web.config, one called ‘recaptchaPublicKey’ and the other called ‘recaptchaPrivateKey’ can you guess what we are supposed to put in there? Using the details from before put the public key in ‘recaptchaPublicKey’ and put the private key in ‘recaptchaPrivateKey’ entries. That is all the configuration the ‘reCAPTCHA for .NET’ requires, all we have to do now is put the code into our application.
The first change that we make is to view for /AccountController/Register. We will need to add
@using Recaptcha.Web.Mvc
to the top of the view, this will allow us to access the reCAPTCHA helper method. Once we have done that we need to make a single modification to the registration form, we just need to add
@Html.Recaptcha()
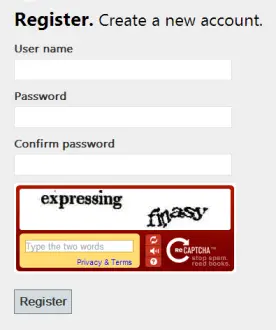
, personally I added it in a new list item after the confirmation password, which meant my registration form looked like this;
@using (Html.BeginForm()) {
    @Html.AntiForgeryToken()
    @Html.ValidationSummary()

    <fieldset>
        <legend>Registration Form</legend>
        <ol>
            <li>
                @Html.LabelFor(m => m.UserName)
                @Html.TextBoxFor(m => m.UserName)
            </li>
            <li>
                @Html.LabelFor(m => m.Password)
                @Html.PasswordFor(m => m.Password)
            </li>
            <li>
                @Html.LabelFor(m => m.ConfirmPassword)
                @Html.PasswordFor(m => m.ConfirmPassword)
            </li>
            <li>
                @Html.Recaptcha()
            </li>
        </ol>
        <input type="submit" value="Register" />
    </fieldset>
}
If you go to the registration page now you will be greeted with the standard registration form and the new reCAPTCHA section, although it isn’t working yet as we haven’t updated the Register action to validate the submitted value. So lets open the AccountController and go down to the HttpPost Register action (the one that actually performs the registration). We will need to add the following code to the action to validate that the user has entered the correct characters.
var recaptchaHelper = this.GetRecaptchaVerificationHelper();
if (String.IsNullOrEmpty(recaptchaHelper.Response))
{
	ModelState.AddModelError("", "Captcha answer cannot be empty");
	return View(model);
}

var recaptchaResult = recaptchaHelper.VerifyRecaptchaResponse();
if (recaptchaResult != RecaptchaVerificationResult.Success)
{
	ModelState.AddModelError("", "Incorrect captcha answer");
	return View(model);
}
What this is doing is checking that the user specified a value, showing them an error if they didn’t and then verifying that the response to the CAPTCHA was correct. This needs to be placed after we have confirmed that the ModeState is valid but before we actually register the user, which will leave your registration action looking like this;
[HttpPost]
[AllowAnonymous]
[ValidateAntiForgeryToken]
public ActionResult Register(RegisterModel model)
{
	if (ModelState.IsValid)
	{
		var recaptchaHelper = this.GetRecaptchaVerificationHelper();

		if (String.IsNullOrEmpty(recaptchaHelper.Response))
		{
			ModelState.AddModelError("", "Captcha answer cannot be empty");
			return View(model);
		}

		var recaptchaResult = recaptchaHelper.VerifyRecaptchaResponse();

		if (recaptchaResult != RecaptchaVerificationResult.Success)
		{
			ModelState.AddModelError("", "Incorrect captcha answer");
			return View(model);
		}

		// Attempt to register the user
		try
		{
			WebSecurity.CreateUserAndAccount(model.UserName, model.Password);
			WebSecurity.Login(model.UserName, model.Password);
			return RedirectToAction("Index", "Home");
		}
		catch (MembershipCreateUserException e)
		{
			ModelState.AddModelError("", ErrorCodeToString(e.StatusCode));
		}
	}

	// If we got this far, something failed, redisplay form
	return View(model);
}
And that is it! Now you can run your app and you should be greeted by something similar to the following