In order for you to get the ListView to act like a multicolumn ListBox you need to set the following properties
| Property Name | New Value | Reason |
|---|---|---|
| FullRowSelect | True | If FullRowSelect is left on its default value of False then when a user selects a row then it will only be a single column which appears to be selected rather than the entire row, which is generally not what you want. |
| HideSelection | False | If HideSelection is left on its default value of True then when the form that contains the ListView doesn’t have focus then the selection is hidden. |
| MultiSelect | False | If you want the user to have the ability to select more than one row then you would need to leave the property value as True but normally you would only want the user to be able to select one row. |
| View | Details | In order for the ListView to appear similar to the ListBox you need to change the view to Details as otherwise the items that you enter may appear as icons. |
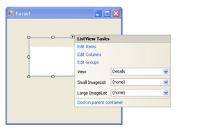
Once you have set the ListView properties appropriately, then you will need to click on the arrow on the top right of the ListView control on your form and click on “Edit Columns”.

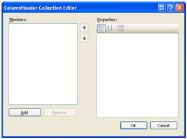
You will then be presented with the following form, which allows for you to define the columns that will be in the ListView control.

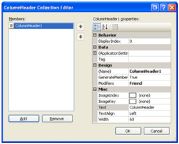
When you click on “Add” you will be displayed the following. Change the “Text” property to the text that you wish to appear as the column header. If you wish to set the “Width” property then do so, but later I will talk about how to resize your columns to the appropriate width after you have inserted the data.

Repeat this for each column that you wish to have in your ListView.
Now that you have dealt with having the appropriate columns we can now start thinking about inserting data into the ListView through our code. You can insert data into the ListView by doing something similar to the following;
Public Class Form1
    Private Sub Form1_Load(ByVal sender As System.Object, ByVal e As System.EventArgs) Handles MyBase.Load
        Dim arr(3) As String

        arr(0) = "Column 1 Line 1"
        arr(1) = "Column 2 Line 1"
        arr(2) = "Column 3 Line 1"
        arr(3) = "Column 4 Line 1"
        ListView1.Items.Add(New ListViewItem(arr))

        arr(0) = "Column 1 Line 2"
        arr(1) = "Column 2 Line 2"
        arr(2) = "Column 3 Line 2"
        arr(3) = "Column 4 Line 2"
        ListView1.Items.Add(New ListViewItem(arr))

        arr(0) = "Column 1 Line 3"
        arr(1) = "Column 2 Line 3"
        arr(2) = "Column 3 Line 3"
        arr(3) = "Column 4 Line 3"
        ListView1.Items.Add(New ListViewItem(arr))

        arr(0) = "Column 1 Line 4"
        arr(1) = "Column 2 Line 4"
        arr(2) = "Column 3 Line 4"
        arr(3) = "Column 4 Line 4"
        ListView1.Items.Add(New ListViewItem(arr))

        arr(0) = "Column 1 Line 5"
        arr(1) = "Column 2 Line 5"
        arr(2) = "Column 3 Line 5"
        arr(3) = "Column 4 Line 5"
        ListView1.Items.Add(New ListViewItem(arr))
    End Sub
End Class
You would probably be looping through some data set adding to the ListView but this shows you how you can add the data. Arr(0) is the first column, arr(1) is the second column, arr(2) is the third column and guess what arr(3) is the fourth column. The result of the above code is;

Now as you can see we have 4 columns with data in them, but each of the columns are wider than they need to be so how can we get it so that so that the columns are resized to be the appropriate width? They we can do this is by using the following code.
Private Sub autoSizeColumns(ByVal lstv As ListView)
    For Each c As ColumnHeader In lstv.Columns
        c.Width = -2
    Next
End Sub
Which gives you the following result;

There are two options when setting the width;
-2 Will look like what you have above. This is that each of the columns are resized to the width of the content of the column, but if you look at Column 4 you will notice that the width of the column has been set to the remainder of the ListView control.
-1 Will give you the form shown below. Again each of the columns are resized to the width of the content of the column and this time Column4 doesn’t extend for the rest of the ListView control.

Sorting a column
One thing that you find that you commonly want to do is to sort a column according to the content of the column.
In order to do this you will need to get the ListViewComparer class from http://www.vb-helper.com/howto_net_listview_sort_clicked_column.html and add it to your solution.
Once you have done this then you will need to add the private field that is specified in the latter half of the above webpage called m_SortingColumn and implement the ColumnClick event for your ListView with the appropriate code again from the latter half of the above webpage.