NuGet is an amazing addition to Visual Studio, it’s one of those features that you wonder how we managed without it before. The only problem is that it requires that there is an active Internet connection to use it. This means by default you’re unable to use NuGet when you’re developing out and about.
![]()
One thing that NuGet does to avoid making unnecessary downloads of packages is it stores a cache of packages that it has downloaded, allowing it to confirm that it already has the latest version of the package and only download the package if there is a newer version available. This cache is stored in the same format as a NuGet repository, most likely to allow for reuse of the code that identifies a package on a server. What this means for us is that you’re able to point your NuGet Package Manager at the cache location and it will pick up the packages that are in the cache, allowing you to install them in a new project that you’re working on.
One thing to remember is that you will not find packages in the cache if you haven’t downloaded them before.
The cache is stored at C:\Users\[username]\AppData\Local\NuGet\Cache\ (yep I’ve stopped supporting Windows XP too, got your back MS)
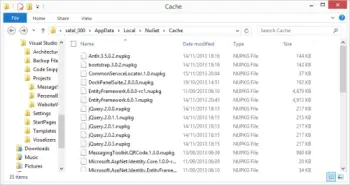
You might be able to see in the picture there are a number off ‘nupkg’ files, these are the NuGet packages that you have already installed and any of their dependencies.
To add the cache as a NuGet repository you need to go to Tools > Options > Package Manager > Package Sources, which if you haven’t set up any additional NuGet repositories will only display one entry.
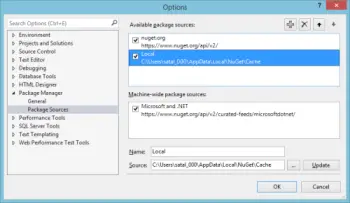
By clicking on the plus button in the top right hand a new entry will appear which you can specify the name and source of this package in the boxes at the bottom. It is also possible to specify the precedence of the package sources by using the up and down buttons, my recommendation would be to leave NuGet.org first as when we are connected this is probably where we would like to be looking at first.
I’m now going to create a new Web Application project, which will be created with the versions of the included NuGet packages that were used when the template was originally created. A number of these NuGet packages have been updated since the template was released and as I’ve updated them in other projects the updated versions are cached on my computer.
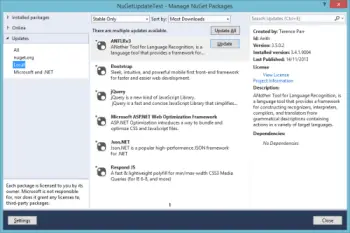
We open up the NuGet Package Manager by right clicking on our project and going to “Manage NuGet Packages…”. By switching to “Updates” the package manager will start to try and poll the servers in order of precedence that we defined earlier, if we are not connected to the Internet then it will take a while for NuGet.org to timeout so by clicking on the source that we added it will load up much quicker. The screenshot below shows the available updates on a brand new Web Application, which we can update all by clicking on ‘Update All’.
This also works if you’re looking to add NuGet packages that you have used in other projects by going to “Online” and searching for the package you want to install, but as I said above this will only work for packages that you have installed on previous projects, so if you have never installed Unity then it won’t appear in your cache.
Conclusion
In this article I have shown you how to locate your local NuGet cache and set it up as a local NuGet repository in Visual Studio. This works well for situations like developing on the move or where you live in remote areas where Internet access is a premium.
As we are just specifying a folder that we want Visual Studio to look for NuGet packages it would be possible to use the same approach to create a corporate repository that everyone can connect to if you develop your own internal NuGet packages or if you wanted to create a NuGet repository on an air-gapped network.